Sending Data to Océ Printer Using .NET

I was asked to turn a old Inventor printing macro into a .NET add-in. This was a fairly simple task and only translating the SendKeys and Shell commands to code required some thinking.

To print using a Océ 9600 large format printer the macro called the following shell command to send the custom settings along with the plot data (generated using Inventors PrintManager.PrintToFile function) to the printer:

"cmd /c copy settings.txt /a + drawing.plt /b "

This told me I needed to first read the custom settings from a file and turn it into ASCII, then combine that with the data in the binary plot file and finally send it to the printer.

I did not know how to send the data to the printer, so I just tried opening a file stream using the printer’s address (without expecting it to work). This gave me the following exceptionally informative error message:

"FileStream was asked to open a device that was not a file. For support for devices like 'com1:' or 'lpt1:', call CreateFile, then use the FileStream constructors that take an OS handle as an IntPtr."

The message told me exactly what I needed to do. I needed to use the CreateFile Windows API call to get a handle I could pass the the FileStream class. As this was the final piece of the puzzle I quite quickly produced the following code:

public void WriteToPrinter(string pltFile, string settings, string printer)
{
    IntPtr handle = IntPtr.Zero;
 
    try
    {
        handle = CreateFile(printer,
            (uint)EFileAccess.GenericWrite,
            (uint)(EFileShare.Read | EFileShare.Write),
            (uint)0,
            (uint)(ECreationDisposition.OpenExisting),
            (uint)(EFileAttributes.NoBuffering),
            (int)IntPtr.Zero);
 
        if (handle.ToInt32() == -1)
        {
            int hresult = Marshal.GetHRForLastWin32Error();
            Marshal.ThrowExceptionForHR(hresult);
        }
 
        using (FileStream stream = new FileStream(handle, FileAccess.Write))
        {
            using (BinaryWriter writer = new BinaryWriter(stream))
            {
                byte[] asciiArray = Encoding.Convert(Encoding.UTF8, 
                    Encoding.ASCII, File.ReadAllBytes(settings));
 
                writer.Write(asciiArray);
 
                byte[] binaryArray = File.ReadAllBytes(pltFile);
                writer.Write(binaryArray);
 
                writer.Close();
            }
        }
    }
    finally
    {
        if (handle != IntPtr.Zero && handle.ToInt32() != -1)
            CloseHandle(handle);
    }
}
 
#region Windows API calls
 
[DllImport("kernel32", SetLastError = true)]
static extern unsafe IntPtr CreateFile(
    string FileName, 
    uint DesiredAccess, 
    uint ShareMode, 
    uint SecurityAttributes, 
    uint CreationDisposition, 
    uint FlagsAndAttributes, 
    int hTemplateFile);
 
[DllImport("kernel32", SetLastError = true)]
static extern unsafe bool CloseHandle(
    IntPtr hObject);  
 
[Flags]
public enum EFileAccess : uint
{
    GenericWrite = 0x40000000
}
 
[Flags]
public enum EFileShare : uint
{
    Read = 0x00000001,
    Write = 0x00000002
}
 
public enum ECreationDisposition : uint
{
    OpenExisting = 3
}
 
[Flags]
public enum EFileAttributes : uint
{
    NoBuffering = 0x20000000
}
 
#endregion
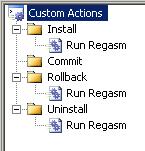
Setup Project: Custom Actions

Sometimes you need to add some custom actions to your setup project to complete the installation by running tools like regasm, ngen or caspol. The last time I was forced to do this was when my Inventor Add-in (COM based) did not get registered properly. The problem was that the Register=vsdrpCOM setting of the project output did not get the assembly codebase set. I needed to get my setup to include the codebase in the assembly registration to get my add-in installed.

The first step was that I added a new class library project to my solution and added there a new class called RegasmInstaller.cs:

[RunInstaller(true)]
public partial class RegasmInstaller : Installer
{
    public RegasmInstaller()
    {
        InitializeComponent();
    }

    public override void Install(IDictionary stateSaver)
    {
        base.Install(stateSaver);

        Regasm(true);
    }

    public override void Rollback(IDictionary savedState)
    {
        base.Rollback(savedState);

        Regasm(false);
    }

    public override void Uninstall(IDictionary savedState)
    {
        base.Rollback(savedState);

        Regasm(false);
    }

    private void Regasm(bool register)
    {
        string file = base.Context.Parameters["Assembly"];
        if (string.IsNullOrEmpty(file))
            throw new InstallException("Assembly not defined");
        if (!File.Exists(file))
            return;

        RegistrationServices regsrv = new RegistrationServices();
        Assembly assembly = Assembly.LoadFrom(file);

        if (register)
        {
            regsrv.RegisterAssembly(assembly, AssemblyRegistrationFlags.SetCodeBase);
        }
        else
        {
            try
            {
                regsrv.UnregisterAssembly(assembly);
            }
            catch
            {
                //Exceptions are ignored: even if the unregistering failes
                //it should notprevent the user from uninstalling
            }
        }
    }
}

The basic idea in writing a installer class is to override the methods you need. Override the install method to perform whatever actions you need and override the rollback and uninstall methods to undo these changes. You usually only need to override the commit method if you need to cleanup any temporary files. Don’t forget to start every override by calling the base function first!

The CustomActionData property of each custom action can be used to pass parameters to the installer class. In the installer class these parameter values can be read from the Context.Parameters dictionary. In my installer I used the property to define the assembly I wanted to get registered.

To get my installer class to actually register an assembly I had two options:  to use the Process class to call regasm.exe or to use the RegistrationServices class. My first version used the regasm.exe, but I later changed it to use the service class, both options are fine.

The second step was to add the project output of the installer class library to the setup project and then add the actions I needed.  For each action I selected the project output containing my installer class.

Setup Actions

Finally I set the CustomActionData property of each action to define the path to the target assembly.

CustomActionData Property